
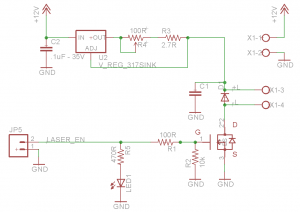
自作CNCに取り付けた1000mwLDは、PWMで制御できません。そこでTTLのLDドライバーを調べていました。 例えば
 とか
とか
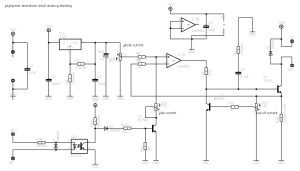 等、ブレッドボードに組んでテストしました。手持ちに適当なトランジスタがなかったり、応答速度や温度特性が思わしくなかったり、満足できなかったのですけれど、考えてみればGrblではスピンドルの回転数がPWMで11ピンに出ています。(grbl 0.9j) LDドライバーを作るより、レーザー用にGrblを書き換えればよいと気付きました。(遅い)
というか既に書き換えをした人がいるはず、ということで「Grbl & Laser engrave」について調べたことをメモしておきます。
(1)CNC Laser for Printing Images and Engraving – Shapeoko 2 based by als_liahona にはArduino のGrbl interpreter を改造して公開されています。
サイトよりgrbl.hexをダウンロードして
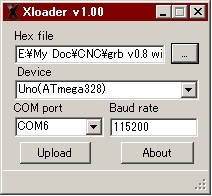 XloaderでArduino uno に書き込みます。 Grbl Controller を立ち上げ
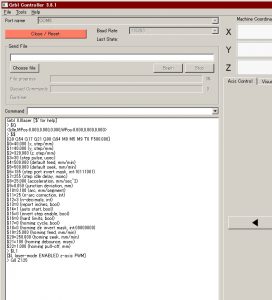
Arduino に接続します。すると Grbl 0.8laser [‘$’ for help] と返ってきます。 コマンド$L1を打つと [$L laser-mode ENABLE z-axis PWM] と返ってきます。 このGrbl interpreterは、CNCモードとLASERモードを切り替えるようにできています。 $L0コマンドを送るとCNCモードに戻るようになっています。
LASERモードでは、Z軸の値が即、LASER出力になり、11ピンに出力されます。値は0~255まです。つまり8bitのgray scale imageがレーザーで扱えるということです。ここで例えば G0 Z125 と打つとduty 50{c4de8a001cbcae7c382f1dd801287804055307794e3d216dc125c16c479c4f5b}の矩形波が11ピンにでているはずです。
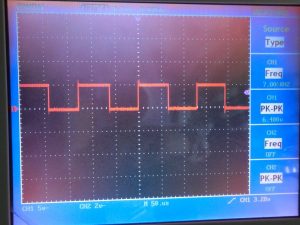
オシロで確認できました。ところが周波数は7.8Khzでした。これでは使えません。
(2)Jtec photonics というサイトにはSetup for Photo Engraving (PWM) というのがあります。そこにはGrblを書き換えたものが掲載されています。 DOWNLOAD J TECH GRBL HEXをダウンロードしてXloaderにて書き込みます。そしてGrbl Controller を立ち上げて、つなぐと
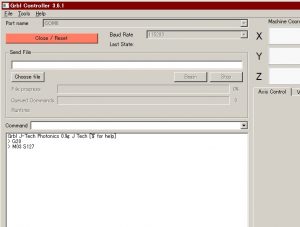
Grbl J-tech Photonics 0.9g J Tech [‘$’ for help] と返ってきます。このソフトでは、モードの変更というのではなく、”M”コマンドで直接にスピンドル回転数をPWMとして与えるようになっています。 値は(1)と同じく0-255までのようです。 試しに「M03 S127」と打って11ピンをオシロで見ますと
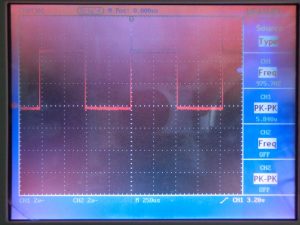 確かに出ています。周波数は975hzでした。 ストロベリーリナックスのLED用定電流ドライバモジュール Ver.2は500hzまでくらいしか応答しないはずですので、残念でした。
使用したArduino uno は予備のものですので、(2)について自作CNC+LDで試していません。それとオシロスコープの画面は、USB接続が不調でキャプチャできません。画面を直接撮ったものですので見にくくてすみません。Grbl interpreter0.9j のソースコードを解析してPWMの周波数を500hz未満に書き換えるか? ソフト苦手です。どなたかご教示を。
追記
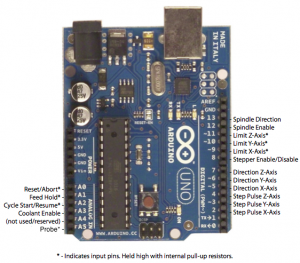
grbl では、v0.8 から v0.9 にかけてピン配置が変更になっています。 Grbl’s Pins
 v0.8
v0.8
 v0.9
v0.9
どうも同じ悩みを抱えている人がいるらしく、CNCにおいてスピンドルモーターにブラシレスを使っていると、回転の制御にラジコンのスピードコントローラ(SC)を使うことになります。ラジコンのSC信号は周波数が低いです。 こちらのサイトでは、0V~5Vの電圧で制御したい人が質問してます。回答とともに引用します。
variable spindle speed PWM o/p at pin D11 #823
ecncshop commented on 17 Oct 2015
Iam using GRBL 0.9I version with variable spindle PWM enabled. My doubt is pin D11 : does it output analog 0V to 5V or actually outputs PWM digital pulse train with changing duty cycle?ecncshop commented on 19 Oct 2015
If it is PWM pulse train: then what is the frequency? Is it user settable ?
This page says we will get 0V to 5V in pin D11
https://github.com/grbl/grbl/wiki/Connecting-Grbl109JB commented on 19 Oct 2015
Not sure if grbl uses a different method, but the standard Arduino pwm is 490 Hz.The 0v to 5 v is for the pwm equivalent. The output is not true analog. The output is a 0v to 5v square wave and the equivalent analog voltage is dependent on the duty cycle of the output. The pins are 5 v, so 100{c4de8a001cbcae7c382f1dd801287804055307794e3d216dc125c16c479c4f5b} duty cycle is 5 v, 80{c4de8a001cbcae7c382f1dd801287804055307794e3d216dc125c16c479c4f5b} is 4v, 60{c4de8a001cbcae7c382f1dd801287804055307794e3d216dc125c16c479c4f5b} is 3v, etc.
EliteEng commented on 19 Oct 2015
Variable Spindle PWM is “PWM” so yes 5v pulses at different duty cyles to give you an average voltage over time. The Mega uses a 16bit timer and the Uno uses an 8 bit timer to generate the pulses. The best source of information is the source code itself (spindle_control.c lines 85-96) which says it has a prescaler of 8 so it should have a frequency of 2MHz. If you want to use it as a analog voltage you can add smotthing (capacitors,etc.)
if you want to use it as pulses you can change the frequency to suit your needs.109JB commented on 20 Oct 2015
@EliteEng
I don’t think 2 MHz is correct. The Arduino clock is 16,000,000 Hz, and the prescaler is 8 as opposed to the default Arduino prescaler of 64, but according to config.h, there are 256 intermediate levels plus the 0{c4de8a001cbcae7c382f1dd801287804055307794e3d216dc125c16c479c4f5b} duty cycle for the speed output (0-256). Also, the frequency would the duration of pin high plus the duration of pin low so you have to divide by 2.So,
16,000,000 / 8 / 256 / 2 = 3906 Hz <<< GRBL’s PWM frequency with the default Arduino prescaler of 64, it is
16,000,000 / 64 /256 /2 = 488Hz <<< Standard arduino PWM frequencyEliteEng commented on 20 Oct 2015
@109JB Yes It has a 2MHz pulse width not frequency
Those calculations dont look right.fPWM = fCPU / (PRESCALER * (1+TOP))
fPWM = 16,000,000 / (8 * (1+255)) = 7812Hz for the UNO
fPWM = 16,000,000 / (8 * (1+65535)) = 30Hz for the Mega**Note With the default Arduino you will find they use phase correct PWM ( not Fast PWM like GRBL ) so that is why you divide by 2 at the end.
EliteEng 氏が回答してる grbl の grbl ディレクトリにある spindle_control.c(line85-96) を抜粋しますと、ちょっと見にくいですが
#ifdef VARIABLE_SPINDLE
// TODO: Install the optional capability for frequency-based output for servos.
#ifdef CPU_MAP_ATMEGA2560
TCCRA_REGISTER = (1<<COMB_BIT) | (1<<WAVE1_REGISTER) | (1<<WAVE0_REGISTER);
TCCRB_REGISTER = (TCCRB_REGISTER & 0b11111000) | 0x02 | (1<<WAVE2_REGISTER) | (1<<WAVE3_REGISTER); // set to 1/8 Prescaler
OCR4A = 0xFFFF; // set the top 16bit value
uint16_t current_pwm;
#else
(93行目) TCCRA_REGISTER = (1<<COMB_BIT) | (1<<WAVE1_REGISTER) | (1<<WAVE0_REGISTER);
TCCRB_REGISTER = (TCCRB_REGISTER & 0b11111000) | 0x02; // set to 1/8 Prescaler
uint8_t current_pwm;
#endif
とあります。ATMEGA2560以外は93行目以下になるようです。プリスケーラ1/8にセットすると周波数が8Mhzになると伝えています。それに対して 109JB氏が2Mhzは正しくないとして、16,000,000 / 8 / 256 / 2 = 3906 Hz <<< GRBL’s PWM frequency という計算になると述べています。 また、EliteEng氏は以下が正しいと述べています。
PWM = fCPU / (PRESCALER * (1+TOP))
fPWM = 16,000,000 / (8 * (1+255)) = 7812Hz for the UNO
fPWM = 16,000,000 / (8 * (1+65535)) = 30Hz for the Mega
で、今回、上記(2)で試した Grbl.8laser.HEXで観察した7.8Khzや、あるいは現在使っている純正のGrbl0.9jが11ピンに出力する7.8Khzに等しいことがわかりました。(上記の青字7812Hz)
結局、引用文中の16,000,000 / 64 /256 /2 = 488Hz <<< Standard arduino PWM frequency が欲しいのですけれど、ソースのどの部分を修正したらよいのか分かりません。 もう少し検討です。 本当の目的は、原点の位置決めを正確にしたいためにレーザー出力を10%程度に弱めたいだけです。
更に追記 Arduino 内部レジスタの説明があります。
Arduino PWM周波数の高周波化